| Choose
your Duet Control Board. See instructions for Duet 2 here: |
|
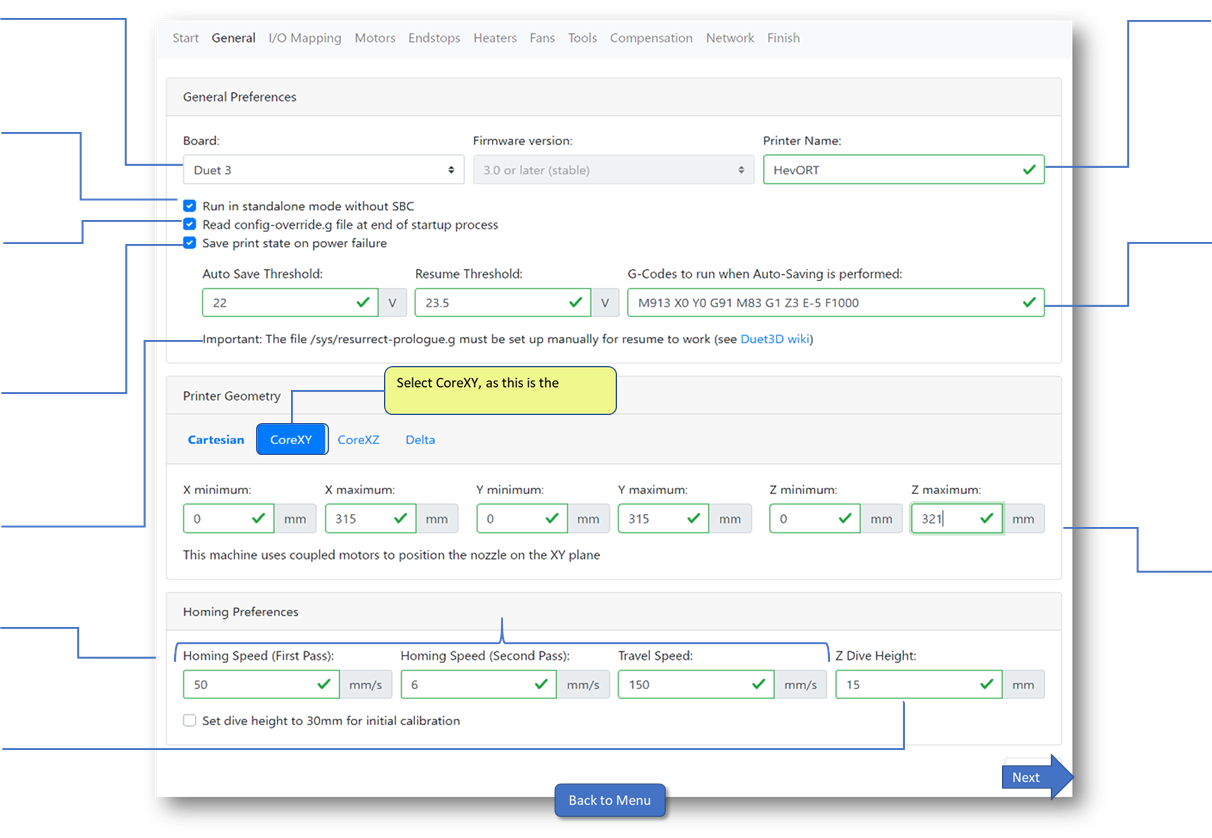
Enter your printer's name. This name will appear in the ribbon of the web browser accessing the Duet Web Control. | ||||||||||||||||||||||||||||||||
| Duet 2 RRF Tool instructions | ||||||||||||||||||||||||||||||||||
| Select
if you are using a Raspberry Pi with your Duet3. Read more about Duet3 and RPI relationship here: |
||||||||||||||||||||||||||||||||||
| -> Duet & Raspberry Pi <- | ||||||||||||||||||||||||||||||||||
| Auto Save Threshold: if
input voltage to the Duet goes below this value, the sequence to power off
motors and record the current print state will be initiated Resume Threshold: If the power did not completely go off and that the Duet was able to stay alive. The print will resume when the voltage reaches higher than this value. I have been using these values with success for the past 2 years. Anything higher than 23v on the AutoSave Threshold would be triggered too often due to the PSU and Electricity Provider accuracy I use. |
||||||||||||||||||||||||||||||||||
| The config-override.g file
will contain some settings that will over-ride the ones into the basic
config.g. PID Tune Values are typically stored into this file when saving using M500 command |
||||||||||||||||||||||||||||||||||
| Very useful feature. As the duet detects a low voltage condition (power outage or other) it will immediately cut the power to the motors and use the remaining energy from the power supply capacitors to rapidly store into memory current print progress. That progress is stored into resume.g file. | ||||||||||||||||||||||||||||||||||
| Read more: -> M911 Gcode <- | ||||||||||||||||||||||||||||||||||
| The resurrect-prolog.g file will be used to prepare the printer to resume the print saved during power outage or low voltage condition. | The true print area of you printer will be defined by a
few things: 1 - Frame Size as defined in the Frame Calculator 2 - Depending on the selected print head, you might have more, or less print area. 3 - The Wobble Wings will consume 18.5mm of Z height. Ex: A 340mm print size frame using the wings will end up being 321.5. But if you are using a print head where the nozzle sits high, you will recuperate some of it. It is proposed to use FrameCalculator values for now and tune them at first run. |
|||||||||||||||||||||||||||||||||
| The values proposed here are a bit higher than the default RRF config tool ones. But we are talking about settig up an HevORT ;) | ||||||||||||||||||||||||||||||||||
| Since the HevORT print bed can be quite tilted, increasing this value to at least 15mm is a good idea in order to avoid early triggering of the Z probe (BLTouch) | ||||||||||||||||||||||||||||||||||